| Line 77: | Line 77: | ||
|✔ | |✔ | ||
|- | |- | ||
|'''Haas Q Commands''' | |'''[[Haas NGC#Q Commands|Haas Q Commands]]''' | ||
|Haas CNC | |Haas CNC | ||
|✓ | |✓ | ||
| Line 110: | Line 110: | ||
| | | | ||
|- | |- | ||
|Haas CNC | |[[Haas NGC#MTConnect|Haas CNC]] | ||
|✓ | |✓ | ||
|✓ | |✓ | ||
Revision as of 11:45, 22 May 2024
Adding a machine
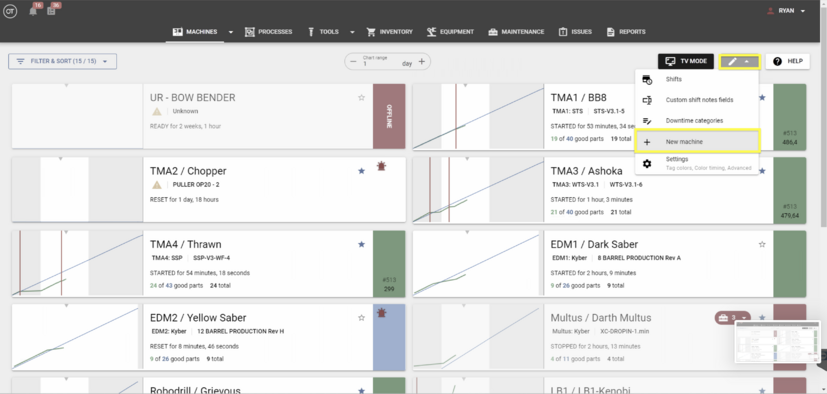
- Navigate to the Machines page by clicking the "Machine Module" in the top navigation bar.
- On the top right side of the screen, click the drop down arrow that's next to the pencil, and click "+ New Machine"
- Enter a unique name for the new machine and click Create.
- Click the name of the machine in the cards view and then click Edit.
- Scroll down to the Setup section.
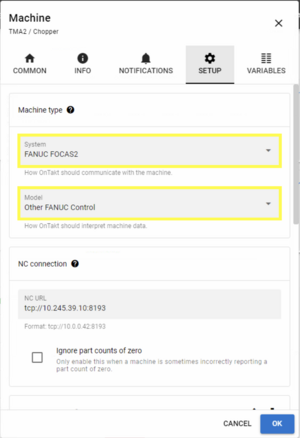
- The most important setup step is the NC URL. This is the IP address and port that OnTakt will use to get machine status and part production data. See Network Setup below for more information.
- If the machine is equipped with a TMAC unit from Caron Engineering, also enter the IP address of the TMAC unit so that OnTakt can track events generated by TMAC. If the machine is also equipped with AutoComp from Caron Engineering, check the box labeled AutoComp Support. Additional actions, such as setting an API key, might be required. Contact support@wolframmfg.com for more information.
- Click Save Changes.
Machine systems
OnTakt can provide more detailed information about machine alarms when the machine is configured with its control type.
In OnTakt, a "system" refers to the software running on a machine's control. Current systems that are supported are:
- FANUC FOCAS2
- Haas (via Ethernet Q Commands)
- Keyence WebMonitor
- MTConnect
- OPC-UA
- OctoPrint
Setting a machine's system
- Navigate to the Machines page
- Click the name of the machine to configure times for in the cards view and then click Edit
- Scroll down to the Setup section
- Choose a system form the dropdown list. If the correct system is not listed, choose the option to leave it blank.
- Click Save Changes
Customizing the system definition
If your machine is configured with additional alarms or your machine system was not available in the list, you can define your own alarms.
- Navigate to the Machines page
- Click the name of the machine to configure times for in the cards view and then click Edit
- Scroll down to the Setup section.
- Click Customize
- In the window that appears, click Add Row to create a row in the alarm definitions table.
- Enter how the machine control reports the alarm (the text that OnTakt currently shows for the alarm) in the Reported alarm text column and the detailed message you would like to see instead in the Custom alarm message column.
- If you have multiple alarms to add, insert more rows and add each one. Use the delete button to remove rows.
- When you are done, click OK, then scroll down and click Save Changes
Customization import/export
To copy alarm definitions from an external source or between machines, you can download the alarm definition table as a TSV (tab-separated value) file and import that file into another table.
Importing will add new entries and replace the messages of entries where the alarm text matches, but will not delete existing entries.
To import from another source, make sure you have a TSV file formatted like this, where \t is a tab character (0x09) and \n is a newline character (0x0A):
ReportedAlarmText1\tCustomAlarmMessage1\n
ReportedAlarmText2\tCustomAlarmMessage2\n
...
Click Import at the bottom of the alarm definition edit window, choose the file, click OK, then scroll down and click Save Changes.
To export the alarm definition table to a file on your computer, click Export at the bottom of the alarm definition edit window. This file can then be imported to another machine or saved as a backup.
Supported features
| System | Model | Cycle state | Part count | Emergency stop | Program name | Alarms | Variables | Feed rate override | Active tool (Proxy 2.7.11+) |
|---|---|---|---|---|---|---|---|---|---|
| FANUC FOCAS | ✔ | ✔ | ✔ | ✔ | ✔ | ✔1 | ✔ | ✔ | |
| Haas Q Commands | Haas CNC | ✓ | ✓ | ✓ | ✓1 | ✓ | |||
| Keyence | MD-X | ✓ | ✓ | ✓ | |||||
| MTConnect | DMG MORI | ✔ | ✔ | ✓ | ✔ | ✓ | ✔ | ||
| Haas CNC | ✓ | ✓ | ✓ | ✓ | ✓2 | ✓2 | ✓ | ✓ | |
| Mazak | ✓ | ✓ | ✓ | ✓ | ✓ | ✓ | ✓ | ✓3 | |
| Okuma OSP | ✓ | ✓ | ✓ | ✓ | ✓ | ✔ | ✓ | ✔ | |
| OPC-UA | Siemens SINUMERIK | ✓ | ✓ | ✓ | ✓ | ✓ | ✓1 | ✓ | ✓ |
| XMC | Generic | ✓ | ✓ | ✓ | ✓ | ✓ | ✓ | ✓ |
✓ indicates single-path support
✔ indicates multi-path support (requires OnTakt proxy version 2.8.0+)
1 Only variables used in OnTakt are read from the control, including:
- Program load variable
- Machine part count variable
- Process part count variable
- Process display variable
- Process mapped variables
2 Haas controls must have software version 100.20.000.1200 or newer for full MTConnect functionality.[source]
3 MAZATROL controls must have MTConnect schema version 1.4 or newer to report the active tool.
Network setup
Machine Setup tells OnTakt where to connect to retrieve information from machine controls and TMAC units.
NC URL: this is the protocol, IP address, and port of the machine control.
- For controls using MTConnect, see MTConnect.
- For FANUC controls using FOCAS, see FANUC FOCAS.
- For Siemens SINUMERIK controls with OPC-UA, see Siemens SINUMERIK.
- Even if the machine type is not listed, it still may work via XMC. See XMC OnTakt Integration for more information.
How to set up machine IP addresses:
- On the Ontakt Machines Tab, click the name of the machine on the card you want to set the IP address up for.
- Click "EDIT."
- Go to the SETUP tab.
- Under the NC connection window, enter the desired NC URL you want to set for the machine. Make sure you follow the format provided.
- Click OK.
TMAC URL: this is the protocol, IP address, and port of the Caron MTConnect Adapter that is serving MTConnect XML data. The format is the same as the NC URL.
Ignore part counts of zero: certain configurations of machine controls may intermittently report a part count of zero. This causes OnTakt to reset its internal counter and then create as many parts as the machine reports in total once the issue is resolved. This appears as large vertical runs of parts on the machine's production chart. Enabling this setting will cause OnTakt to keep its internal part count unchanged when the machine reports a part count of zero. Only enable this setting if a machine is affected by this problem, as it prevents OnTakt from creating a part when the machine's part count changes from 0 to 1. Added in server version 4.10.21.
Sorting the machine list
The order in which the machines are listed on the Machines page can be changed. Note that the machines list is ordered such that the left column is filled with the first half of the list, then the right column is filled with the second half of the list. On smaller screens, the list appears as one column in this same order.
To rearrange machines:
- Drag a machine on the Machines page.
- After picking up a machine, drop areas will appear at the beginning and end of each column and between machines.
- Drop the machine onto one of these targets.
- The page will refresh, and the machine should appear in the new position.
Machine notifications
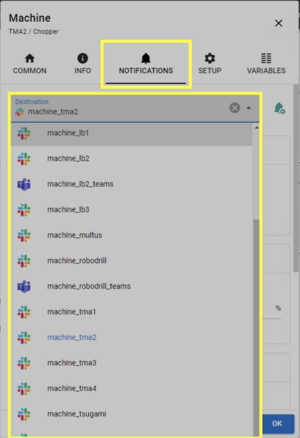
OnTakt can send notifications to a Slack channel or Microsoft Teams chat when machine or TMAC events occur, as well as a daily report of part production and TMAC activity.
Slack Webhook URL and Microsoft Teams Webhook URL must be set up by an administrator in your workspace. This URL points to one specific channel, so different channels can be created for different machines, but the same URL can be used by multiple machines to collect their notifications in one channel.
TMAC alarm grouping tells OnTakt to wait to send a message until this many alarms have been reported since the last message. Setting this to 1 will send a message for every alarm as soon as TMAC reports it to OnTakt.
Shifts
Shift time overrides were replaced by Shifts in server version 4.10.5


