No edit summary |
|||
| (22 intermediate revisions by 2 users not shown) | |||
| Line 5: | Line 5: | ||
</onlyinclude> | </onlyinclude> | ||
== | == Machine settings == | ||
=== Defining shift times === | |||
See [[OnTakt: Shifts|Shifts]] to learn how to create shifts. | |||
== | === Color timing === | ||
How | Color timing can be configured by clicking the "Edit" button in the top right hand corner of the screen, and click on "Settings" | ||
[[File:Screenshot 2024-07-02 at 8.55.33 AM.png|center|thumb|1199x1199px]] | |||
* '''Idle time limit:''' How long to fade out a machine's active color when idle. Set to 0 to fade out immediately. The default is 1200 seconds. | |||
* '''Feed hold time limit:''' How long to fade in a machine's feed hold color. Set to 0 to fade in immediately. The default is 300 seconds. | |||
=== Advanced machine settings === | |||
==== Part report limit ==== | |||
If a machine reports more than this number of parts at once, only one part will be created. | |||
This prevents overloading the server in cases where program errors cause the machine to report the part count incorrectly. | |||
[[File:Screenshot 2024-07-02 at 8.59.21 AM.png|center|thumb|1151x1151px]] | |||
==Cost savings estimation== | |||
How much money is TMAC saving you? | |||
[[File:Screenshot 2024-07-02 at 9.28.18 AM.png|center|thumb|1241x1241px]] | |||
Use the Calculator button to determine the values for these fields. | |||
These values will be shown in reports based on how frequently TMAC alarms occur. | * In the calculator window, enter how much each event listed would cost you, as well as how frequently it happens. Click "Save calculations" to save your work for later and automatically copy the calculated totals into the alarm value fields. | ||
* For frequency, 1 means it always happens, 0 means it never happens, 0.5 means it happens in half of cycles, etc. | |||
* These values will be shown in reports based on how frequently TMAC alarms occur. | |||
==User management== | ==User management== | ||
To change a user's password: click the Edit button next to that user and enter a new password. | *To manage users: click on current profile in the top right of the screen, click on "Global Settings", and navigate to the Users Tab. Click "Add" and set the username, password, active status, access level, kudos emoji, | ||
*To change a user's password: click the Edit button next to that user and enter a new password. | |||
*To prevent a user from logging in without deleting their account: switch off the Active option in the user editor. | |||
For details on editing individual users, see [[OnTakt: User settings|User settings]].<html> | |||
<div style="position: relative; padding-bottom: 64.86486486486486%; height: 0;"><iframe src="https://www.loom.com/embed/659c1c41f21c45a2a908eb0cd7651630?sid=86d93479-06c7-4bc3-9695-0123eb8c4710" frameborder="0" webkitallowfullscreen mozallowfullscreen allowfullscreen style="position: absolute; top: 0; left: 0; width: 100%; height: 100%;"></iframe></div> | |||
</html> | |||
{| class="wikitable" | {| class="wikitable" | ||
|- | |- | ||
| | | | ||
|} | |} | ||
==Time zone== | ==Time zone == | ||
A production day as displayed on charts will be defined in this time zone. It is also used for server-side time-based events such as notifications and reports. Except where otherwise specified, times are displayed in the browser's local time zone regardless of this setting. | |||
Changing the time zone affects the server's time-based actions, such as sending midnight notifications. Times displayed in the web interface will always be shown in the time zone of the client device (computer, phone, etc.). | Changing the time zone affects the server's time-based actions, such as sending midnight notifications. Times displayed in the web interface will always be shown in the time zone of the client device (computer, phone, etc.). | ||
Times are stored in the database using [[wikipedia:Coordinated_Universal_Time|UTC]], so changing the time zone will not change any other database entries, such as part or event times. | Times are stored in the database using [[wikipedia:Coordinated_Universal_Time|UTC]], so changing the time zone will not change any other database entries, such as part or event times. | ||
Steps to select time zone: | |||
#Click on the profile name in the top right hand corner of the screen, select "global settings" | |||
#Go to the "System Options" tab, chose the desired time zone | |||
[[File:Ontakt Settings - Time Zone.mov|800px|frameless|center]] | |||
==Notification setup== | ==Notification setup== | ||
See [[Notification setup]] for help connecting to external services. | |||
== | <html> | ||
<div style="position: relative; padding-bottom: 64.86486486486486%; height: 0;"><iframe src="https://www.loom.com/embed/be8b6c2b32674375a5389c8573cc7efc?sid=35293628-0dc8-4559-82bf-edd8015f6202" frameborder="0" webkitallowfullscreen mozallowfullscreen allowfullscreen style="position: absolute; top: 0; left: 0; width: 100%; height: 100%;"></iframe></div> | |||
</html> | |||
=== | ==Trash== | ||
The trashed objects list is part of the [[OnTakt: Audit Log|Audit Log]]. | |||
== | ==Database== | ||
Downloaded files are PostgreSQL dumps that can be loaded using [https://www.postgresql.org/docs/current/app-pgrestore.html pg_restore]. | |||
[[ | |||
For example, to convert a backup named <code>ontakt_db.dump</code> to a plain text SQL file named <code>ontakt_db.sql</code>, run <code>pg_restore -f ontakt_db.sql ontakt_db.dump</code>. | |||
[[File:Ontakt Settings - Database.mov|1920x1080px|thumb]] | |||
[[Category:OnTakt User Guide]] | [[Category:OnTakt User Guide]] | ||
{{DEFAULTSORT:Settings}} | {{DEFAULTSORT:Settings}} | ||
Latest revision as of 18:53, 18 September 2024
Part of the OnTakt User Guide.
The settings window allows administrators to change how OnTakt behaves.
Machine settings
Defining shift times
See Shifts to learn how to create shifts.
Color timing
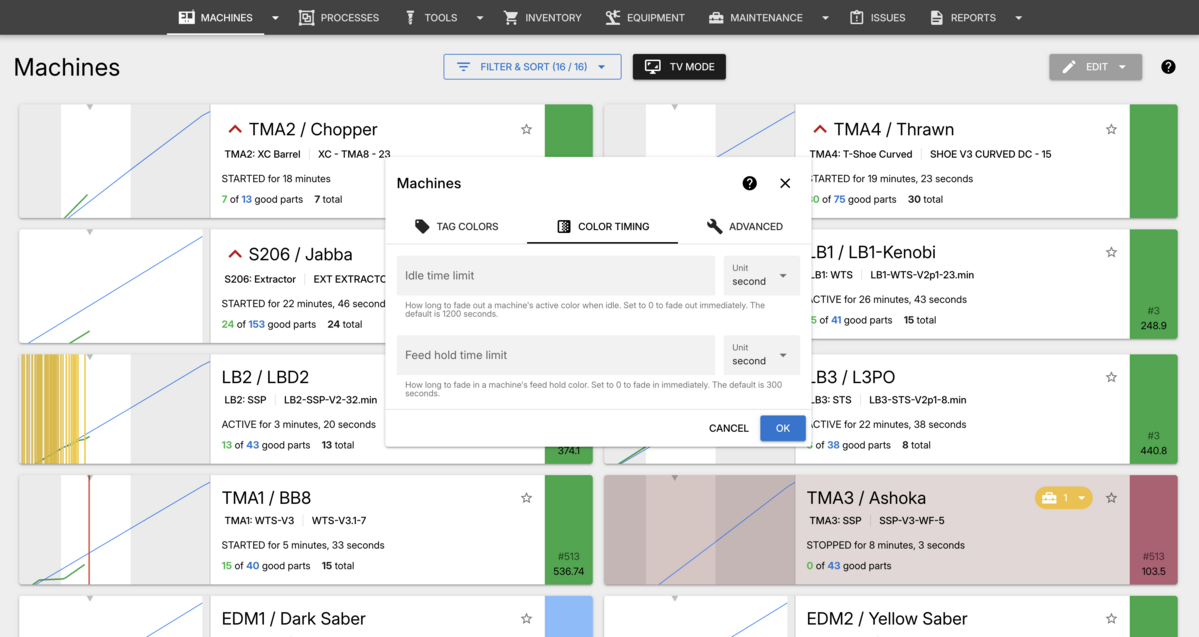
Color timing can be configured by clicking the "Edit" button in the top right hand corner of the screen, and click on "Settings"
- Idle time limit: How long to fade out a machine's active color when idle. Set to 0 to fade out immediately. The default is 1200 seconds.
- Feed hold time limit: How long to fade in a machine's feed hold color. Set to 0 to fade in immediately. The default is 300 seconds.
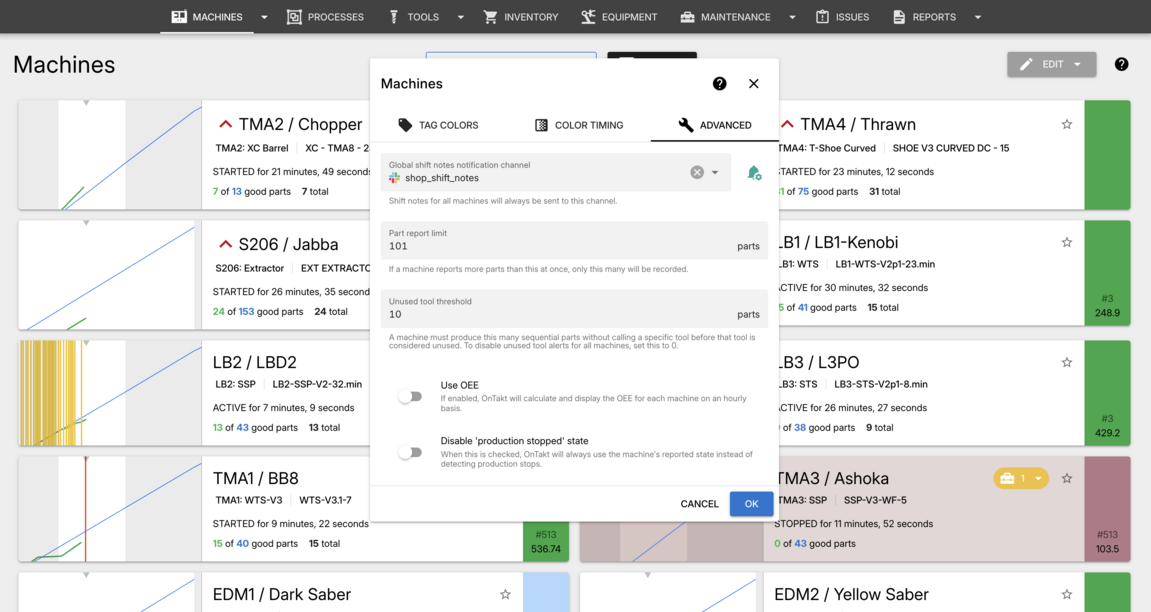
Advanced machine settings
Part report limit
If a machine reports more than this number of parts at once, only one part will be created.
This prevents overloading the server in cases where program errors cause the machine to report the part count incorrectly.
Cost savings estimation
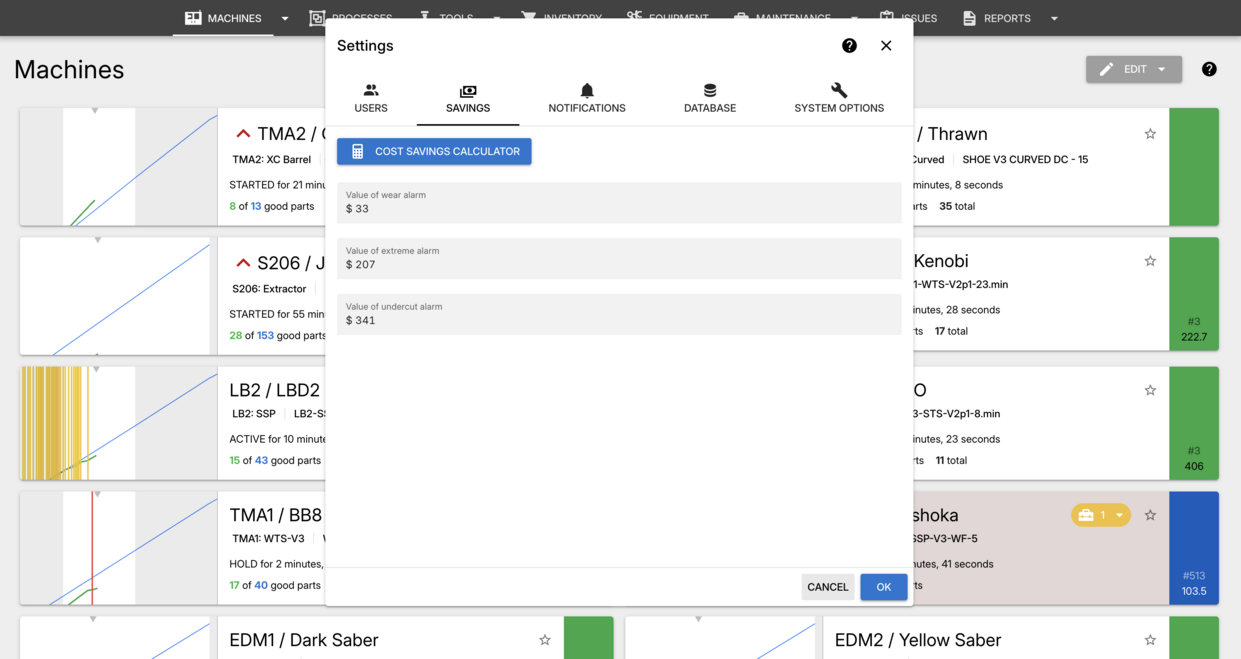
How much money is TMAC saving you?
Use the Calculator button to determine the values for these fields.
- In the calculator window, enter how much each event listed would cost you, as well as how frequently it happens. Click "Save calculations" to save your work for later and automatically copy the calculated totals into the alarm value fields.
- For frequency, 1 means it always happens, 0 means it never happens, 0.5 means it happens in half of cycles, etc.
- These values will be shown in reports based on how frequently TMAC alarms occur.
User management
- To manage users: click on current profile in the top right of the screen, click on "Global Settings", and navigate to the Users Tab. Click "Add" and set the username, password, active status, access level, kudos emoji,
- To change a user's password: click the Edit button next to that user and enter a new password.
- To prevent a user from logging in without deleting their account: switch off the Active option in the user editor.
For details on editing individual users, see User settings.
Time zone
A production day as displayed on charts will be defined in this time zone. It is also used for server-side time-based events such as notifications and reports. Except where otherwise specified, times are displayed in the browser's local time zone regardless of this setting.
Changing the time zone affects the server's time-based actions, such as sending midnight notifications. Times displayed in the web interface will always be shown in the time zone of the client device (computer, phone, etc.).
Times are stored in the database using UTC, so changing the time zone will not change any other database entries, such as part or event times.
Steps to select time zone:
- Click on the profile name in the top right hand corner of the screen, select "global settings"
- Go to the "System Options" tab, chose the desired time zone
Notification setup
See Notification setup for help connecting to external services.
Trash
The trashed objects list is part of the Audit Log.
Database
Downloaded files are PostgreSQL dumps that can be loaded using pg_restore.
For example, to convert a backup named ontakt_db.dump to a plain text SQL file named ontakt_db.sql, run pg_restore -f ontakt_db.sql ontakt_db.dump.


