No edit summary |
No edit summary |
||
| Line 1: | Line 1: | ||
[[Category:Smart Light]] | [[Category:Smart Light]] | ||
[[ | [[Smart Light|Back to Smart Light Home Page]] | ||
The configuration software contains an easy to use interface that simplifies the creation of a recipe file. A recipe file can be uploaded or downloaded from the device at will and can be saved on a local PC for backup. This feature simplifies configuration of multiple devices that are performing the same tasks. The configuration software allows the user to demo the light on the fly using a single USB connection. Once the hardware and software are installed, run the Caron Engineering Smart Light configuration application. On the left side of the application interface there is a navigation bar containing the following 4 buttons: | The configuration software contains an easy to use interface that simplifies the creation of a recipe file. A recipe file can be uploaded or downloaded from the device at will and can be saved on a local PC for backup. This feature simplifies configuration of multiple devices that are performing the same tasks. The configuration software allows the user to demo the light on the fly using a single USB connection. Once the hardware and software are installed, run the Caron Engineering Smart Light configuration application. On the left side of the application interface there is a navigation bar containing the following 4 buttons: | ||
Latest revision as of 12:49, 26 October 2022
The configuration software contains an easy to use interface that simplifies the creation of a recipe file. A recipe file can be uploaded or downloaded from the device at will and can be saved on a local PC for backup. This feature simplifies configuration of multiple devices that are performing the same tasks. The configuration software allows the user to demo the light on the fly using a single USB connection. Once the hardware and software are installed, run the Caron Engineering Smart Light configuration application. On the left side of the application interface there is a navigation bar containing the following 4 buttons:
- Light Demo: Configure modes for demonstration on a Smart Light connected by USB before creating a recipe.
- Recipe Editor: Create a recipe by creating modes. Connection settings and User color are also programmed here
- Connection: View information about the connected device and installed software. Recipes can be pushed to or pulled from the connected device as
- Information: Review the release notes or contact Caron Engineering for support through the CEI website.
Light Demo
The light demo section allows testing or demonstrating the available mode types directly on the connected light stack including setting a temporary user color for testing. This can be a valuable tool when brainstorming about the different custom modes before creating a recipe file. All parameters that are available when creating modes are available for testing in the light demo.
Using the Light Demo
To test a specific mode type in the light demo, select the desired mode from the tabs at the top of the screen. The body contents will change with respect to which tab is selected. Each option that is set in the body is outlined in purple. Configure the selected mode as desired and press the Push to Light button to test the configured mode. The Clear Light button clears the light stack (turns all light segments to the off color).
Note: The Push To Light button is not needed when using Level mode in the light demo if the Auto Push check box is checked. This will automatically push the light count and level color to the light stack when the light count value is changed. This functionality is only available in Level mode.
Note: The user color is a temporary user color and will change once a recipe has been loaded or the power has been reset on the device.
Recipe Editor
The Recipe Editor tab allows recipe files to be created or edited on a local system. Recipe files can also be downloaded the recipe from a connected device and loaded into the interface for editing. The editor section has the following tabs:
- Custom Modes: Create and edit various mode types stored in the recipe file
- RS232: Edit the RS232 connection settings for the device
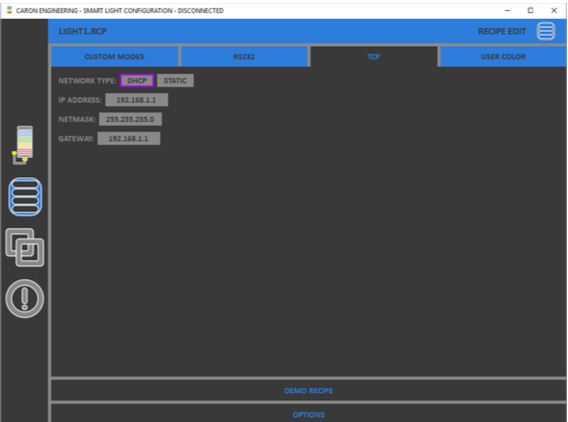
- TCP: Edit the TCP/IP connection settings for the device
- User Color: Program a custom global RGB color usable in any mode in the recipe
All of the programmed modes and setting are saved in the recipe file. The maximum number of configurable modes allowed is 1000. Each mode can be tested at any point in time before saving and uploading to the device. This section can also be used when not connected to a device.
Recipe File
The Caron Engineering Smart Light configuration is all stored in a file called a Recipe file with the extension of .rcp. The recipe file is a binary file consisting of all of the custom mode types and configuration settings that were configured using the Caron Engineering Smart Light Configuration software. Storing all custom modes and configurations in a file that can be uploaded and downloaded from the device makes it easy to backup any configuration for future use. The recipe file is not bound to one system. A single recipe file may be uploaded to multiple Caron Engineering IO Link Controllers for cases where multiple systems require the same functionality.
Note: Version 1.0+ recipes are not compatible with Version 2.0+ recipes. Version 2.0+ recipe were moved to a binary file format for efficiency.
Creating Recipes
When the Recipe Editor is first selected, the software prompts the user to load a recipe. There are the following three options:
- l Create: Generates a default recipe file that already contains a few custom modes as foundation to build the recipe.
- l Existing: Loads an existing recipe file located on an accessible drive into the system.
- l From Device: Downloads the file from the connected Caron Engineering Smart Light and automatically loads the file into the system. This requires the device to be connected.
After creating or loading a recipe, full access to the recipe editor is granted.
Custom Modes
The first page of the recipe editor is the Custom Modes tab. In the Custom Modes tab, modes can be created, removed or tested. Once modes are created the recipe file can be saved, saved as a new file, or unloaded.
The mode table is where all of the modes that have been created are stored. The mode currently being edited in the body is outlined in purple. When a recipe is created, 3 default modes are automatically be generated and shown on the mode table. The cell contents for each mode contain the mode number (1), the mode type (2), and a test button (3).
Mode Type Symbols:
The mode types are represented in the mode table as one letter symbols. Each mode is represented by the following letters:
- Segment Mode: S
- Level Mode: L
- Run Light Mode: R
Test and Clear Light Buttons
The test button has the same functionality as the Push To Light button in the "Light Demo" section. The configured mode is sent to the connected light stack. The Clear Light button sets all light segments on the stack light to the off color to clear the test.
Creating Modes
To create a new mode, click the "+" button at the bottom of the mode table. When the "+" button is clicked, select the desired mode number and mode type to be added.
To select the mode number, use the up and down buttons or slide the slider bar to the desired mode number. The number itself can also be clicked and entered using a keyboard. The mode number can range from 1 to 1000, but each mode number can only be used once in a recipe. If the mode number already exists, the mode number and Create button will be highlighted red.
After selecting a mode number, select a mode type by pressing the desired mode type button. Press the Create button to add the new mode to the list of modes in the mode table.
Removing Modes
The "-" button at the bottom of the mode table will remove the selected mode from the mode table. to remove a specific mode, select it from the mode list and click the "-" button.
RS232 Settings
The RS232 tab contains all of the parameters that need to be set to enable RS232 communications. The following parameters need to be set if utilizing RS232 communication:
- Baud Rate: Available values are 4800, 9600, 19200, 31250, 38400, 57600 and 115200
- Data Bits: Available values are 5, 6, 7 and 8
- Stop Bits: Available values are 0, 1 and 2
- Parity: Available values are NONE, EVEN and ODD l Delimiter: Sets the delimiter for RS232 commands
Note: Changes will not get pushed to the hardware until the entire recipe is pushed. 0
TCP Settings
The TCP tab contains all of the parameters that need to be set to enable Ethernet communications. The following parameters need to be set if utilizing Ethernet communication:
- Network Type: DHCP or Static
- IP Address: Enter the IP address of the device communicating with the Smart Light hardware
- Stop Bits: Enter the Netmask of the device communicating with the Smart Light hardware
- Parity: Enter the Gateway of the device communicating with the Smart Light hardware
Note: Changes will not get pushed to the hardware until the entire recipe is pushed.
User Color
The User Color tab is where the global user color for the loaded recipe can be configured. The user color is a user-configured RBG color that is usable within any modes in the recipe. The full RBG spectrum is available. Use the three color sliders to make the custom user color. Be wary that if the color is not bright enough it may be difficult to differentiate between the user color and white or off.
Committing Recipe Changes
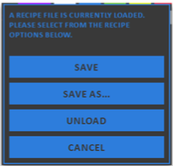
After all changes are made to the custom modes and configuration settings, the changes need to be committed to a recipe file. To commit the changes to the recipe file, click the Options button at the bottom of the Recipe Editor.
Each of the button descriptions are listed below:
- Save: Commits all of the mode and configuration changes to the existing recipe file loaded in the system.
- Save As...: Commits all of the mode and configuration changes to a new recipe file. This will change the working file to the newly created file in the save as dialog.
- Unload: Unloads the loaded recipe file from the system. All unsaved changes will be lost.
- Cancel: Cancels the commit and closes the options window.
Connection Tab
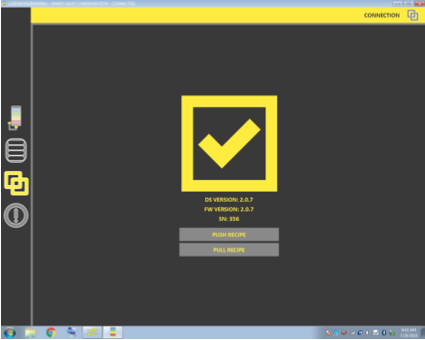
The connection section displays the connection status of the Smart Light hardware. From here, recipe files can be pushed to or pulled from the connected device. When a device is connected, the information is displayed:
- Software Version
- Firmware Version
- Serial Number
Push Recipe
Once all changes have been made to the recipe file, the recipe file needs to be uploaded to the device to be applied to the hardware. To upload the recipe, click the Push Recipe button to upload the recipe to the device.
The device will reboot after the recipe has been committed. Once the device has rebooted successfully, a “Device Connected” dialog will appear on the user interface. The reboot may take up to 5 seconds.
Pull Recipe
There are two different ways to download a recipe from the device. The first is by selecting the From Device option in the load options window. This will download the recipe from the selected device to a local system and automatically load the recipe into the configuration software.
The second way to download a recipe from the connected device is to use the Pull Recipe button. This will download the recipe on the currently connected device to a local file system.
Information Tab
The information section displays the most current release notes and information about the Caron EngineeringSmart Light configuration software version that is installed and running. The information section also provides easy access to the Caron Engineering website for support purposes.


