No edit summary |
|||
| (One intermediate revision by the same user not shown) | |||
| Line 1: | Line 1: | ||
[[Category:TMAC]] | [[Category:TMAC]] | ||
[[ | [[TMAC|Back to TMAC Home Page]] | ||
== '''Overview''' == | == '''Overview''' == | ||
| Line 77: | Line 77: | ||
* Past Year: Displays all events that have occurred in the past year. | * Past Year: Displays all events that have occurred in the past year. | ||
* Custom: Allows the user to input a date range, limiting the displayed events to those that have occurred inside of the date range. | * Custom: Allows the user to input a date range, limiting the displayed events to those that have occurred inside of the date range. | ||
[[File:Event Log Time Filters.png|center|thumb|622x622px|Event Log Time Filters ]] | |||
=== '''Presets''' === | === '''Presets''' === | ||
| Line 91: | Line 92: | ||
# Enter a name for the preset | # Enter a name for the preset | ||
# Click SAVE | # Click SAVE | ||
[[File:Saving a Preset Steps 1-3.png|center|thumb|Saving a Preset Steps 1-3 ]] | |||
[[File:Saving a Preset.png|center|thumb|Saving a Preset ]] | |||
==== '''''Manage Presets''''' ==== | ==== '''''Manage Presets''''' ==== | ||
[[File:Manage Presets Window.png|center|thumb|568x568px|Manage Presets Window ]] | |||
Pressing the PRESETS button opens the Manage Presets window. In this win- dow, users can open, delete, import, and export presets. Additionally, any user created preset can be set as the default preset. | Pressing the PRESETS button opens the Manage Presets window. In this win- dow, users can open, delete, import, and export presets. Additionally, any user created preset can be set as the default preset. | ||
[[File:Screen Shot 2022-08-31 at 12.56.43 PM.png|center|thumb|778x778px|TMAC HMI Action Bar Functionality]] | [[File:Screen Shot 2022-08-31 at 12.56.43 PM.png|center|thumb|778x778px|TMAC HMI Action Bar Functionality]] | ||
| Line 102: | Line 106: | ||
# Navigate to the desired directory and name the preset file | # Navigate to the desired directory and name the preset file | ||
# Click Save | # Click Save | ||
[[File:Exporting a Preset Steps 1-3.png|center|thumb|610x610px|Exporting a Preset Steps 1-3 ]] | |||
===== '''Importing a Preset''' ===== | ===== '''Importing a Preset''' ===== | ||
| Line 109: | Line 114: | ||
# Browse to and select the desired preset file | # Browse to and select the desired preset file | ||
# Click Open | # Click Open | ||
[[File:Importing a Preset Steps 1-3.png|center|thumb|704x704px|Importing a Preset Steps 1-3 ]] | |||
=== '''Exporting Event Log Data''' === | === '''Exporting Event Log Data''' === | ||
| Line 131: | Line 137: | ||
# Press Save | # Press Save | ||
# Click DONE to close the window | # Click DONE to close the window | ||
[[File:Exporting Event Log Data Steps 2-5.png|center|thumb|728x728px|Exporting Event Log Data Steps 2-5 ]] | |||
[[File:Exporting Event Log Data Steps 6-7.png|center|thumb|729x729px|Exporting Event Log Data Steps 6-7 ]] | |||
Latest revision as of 13:25, 26 October 2022
Overview
The Event Log button in the TMAC action bar opens a separate window displaying data pertaining to system events. System events include but are not limited to alarms, system resets, job loads, starts and stops. The user can add additional data columns beyond the defaults for the events displayed in the Event Viewer. Additionally, the user can apply filters to columns that limit the events displayed based on configured logic statements.
Event Viewer Interface
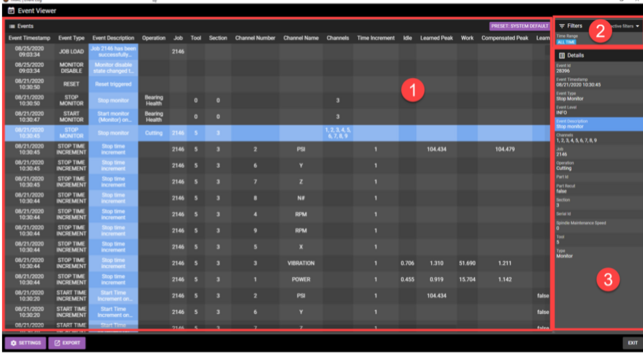
The Event Viewer interface is split into the following three sections:
- Events: A tabulated list of system events based on the columns and filters chosen.
- Filters: A list of applied filters.
- Data: Additional data displayed for a selected event. A specific event can be selected from the list of events by clicking anywhere in the row of the specified event. The additional data displayed is dependent on the type of system event selected.
Column and Filters
TMAC stores a large amount of event data, but not all event data is displayed in the Event Viewer by default. Users may want to display more data or specific events that meet certain criteria. This can be done utilizing Columns and Filters.
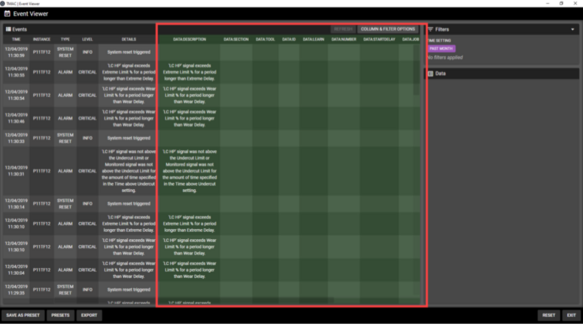
Adding a column amends the event viewer by displaying the additional data correlated with that column for each event. For example if a user desires to have alarm descriptions displayed in the Event Viewer, adding the "Alarm Description" column amends the column to Event Viewer.
Filters allow the user to remove undesired events from the Event Viewer. Filters work in conjunction with columns by utilizing filter conditions to remove data that doesn't satisfy the proposed conditions. For example, if a user wants to view only "Alarm" type events, a filter needs to be applied to the "Type" column. Setting a filter with the condition "Equal to ALARM" displays only events that contain "ALARM" in the "Type" column
Note: The RESET button resets the column and filter options to the default set- tings.
Adding Columns to the Event Viewer
To add columns to the Event Viewer, perform the following steps:
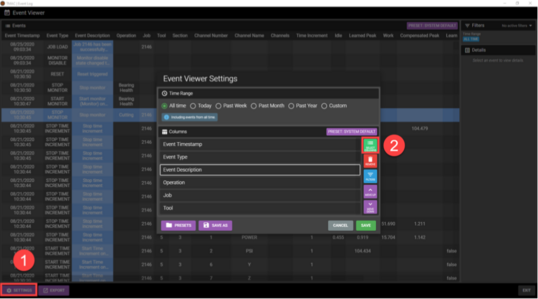
- Click the Settings button
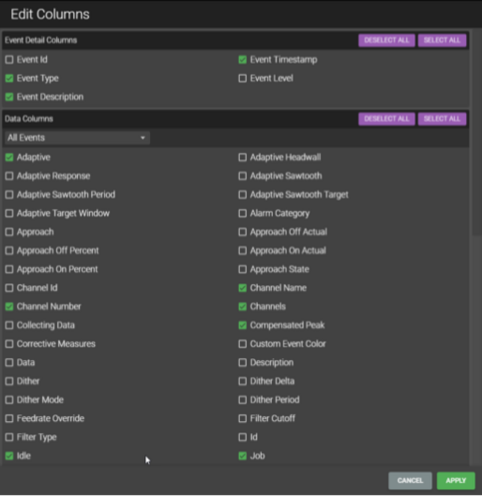
- Click the Select Columns button to open a list of column types
- Each column type has an associated check-box. Mark all desired columns by clicking the associated check-boxes.
- Note: The Data Columns list can be filtered using the drop-down menu. Columns for all event types are displayed by default. Additionally the DESELECT ALL and SELECT ALL buttons can be used mark all columns for selection.
- Click Apply to close the Edit Columns Window
- Click SAVE to close the Event Viewer Settings window
All selected columns are added to the Event Viewer
Reordering Columns
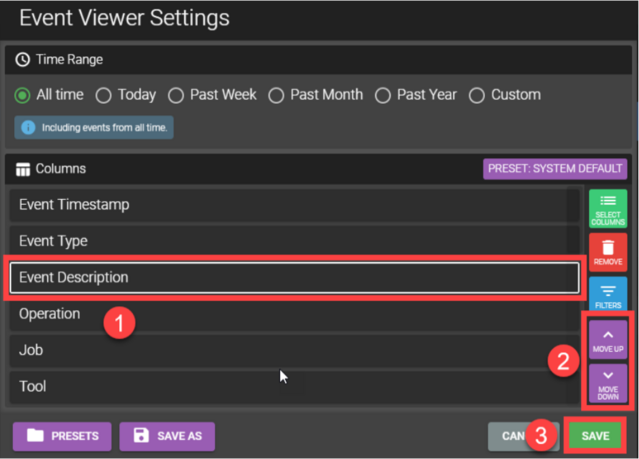
After adding a column to the event log, the column is amended at the end of the list of columns by default. The list of columns in the Event Viewer Settings window are listed in the order they appear in the event log (left to right). If desired, a column can be moved up or down the list using the following steps:
- Select a column from the list in the Event Viewer Settings
- Move the column to the desired position using the MOVE UP or MOVE DOWN buttons
- Press SAVE
Adding a Filter to a Column
To add a filter to a column, perform the following steps:
- Click the SETTINGS button
- Select a column to apply a filter to
- Click the FILTERS button
- Click the ADD button
- Select a filter condition from the drop-down menu. The following options are available:
- Equal To
- Less Than
- Greater Than
- Between
- After a filter condition has been selected, complete the logical expression by entering a value.
- Note: When utilizing the Between filter condition, the user must input a minimum and maximum value.
- Click APPLY
- Repeat steps 4-7 for any additional filters that need to be applied or continue to step 9
- Click SAVE to close the Event Viewer Settings window
The filter looks for event data in the column that the filter was applied to and removes all events that do not satisfy the filter conditions.
Time Filters
The Event log can be filtered based on time and date, in addition to columns and row filters. After opening the Event Viewer Settings, the following time filters can be selected:
- All Time: Displays all events recorded since system installation or the last data purge.
- Today: Displays events that occurred on today's date.
- Past Week: Displays all events that have occurred in the past week.
- Past Month: Displays all events that have occurred in the past month.
- Past Year: Displays all events that have occurred in the past year.
- Custom: Allows the user to input a date range, limiting the displayed events to those that have occurred inside of the date range.
Presets
Presets allow the user to save applied columns and filters to easily switch between specific data sets. For example, a user could have a preset that displays only alarm events and a preset with only Job Load events. Switching between presets prevents the user from having to remove and re-add the columns and filters every time different data needs to be viewed. TMAC is installed with a system default preset.
A user created preset can also be set as the default in place of the system default.
Saving a Preset
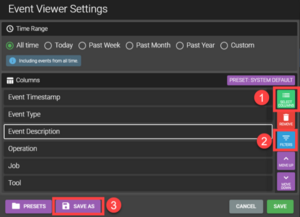
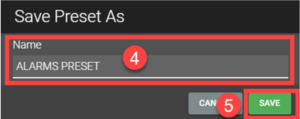
Perform the following steps to save a preset
- Add or remove any data columns desired for the custom preset
- Apply any filters to eliminate unwanted events
- Click the SAVE AS button
- Enter a name for the preset
- Click SAVE
Manage Presets
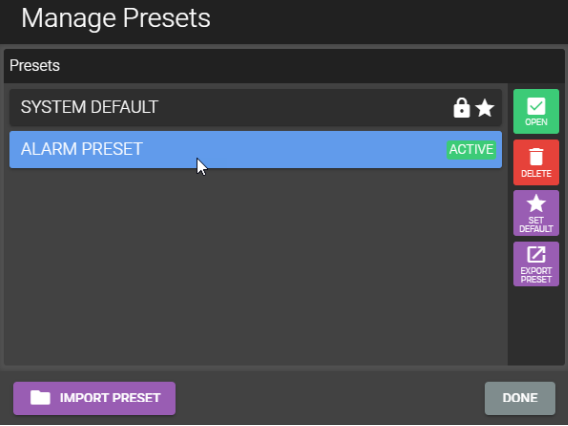
Pressing the PRESETS button opens the Manage Presets window. In this win- dow, users can open, delete, import, and export presets. Additionally, any user created preset can be set as the default preset.
Exporting a Preset
Use the following steps to export preset:
- In the Manage Presets window, click the EXPORT PRESET button
- Navigate to the desired directory and name the preset file
- Click Save
Importing a Preset
Use the following steps to import preset for use in the Event Log:
- In the Manage Presets window, click the IMPORT PRESET button
- Browse to and select the desired preset file
- Click Open
Exporting Event Log Data
The data from the event log can be exported to a file. To export event log data, use the following steps:
- Click the EXPORT button
- Select a time frame from the following options:
- All Time
- Today
- Past Week
- Past Month
- Past Year
- Custom: Enter a custom date range
- Select a Format
- CSV: Exports the event log data to a .csv file
- HTML: Exports data to a file in HTML format
- Select additional options
- Export all columns: If enabled, TMAC exports data from all columns instead of the currently configured columns.
- Export all events: If enabled, TMAC exports data from all events within the selected time frame, ignoring any applied filters.
- Click EXPORT
- Navigate to the desired directory and name the file
- Press Save
- Click DONE to close the window
