No edit summary |
No edit summary |
||
| (One intermediate revision by the same user not shown) | |||
| Line 1: | Line 1: | ||
'''IMPORTANT:''' Before following any instructions on this page, back up anything currently on the flash drive as the entire drive will be erased. | |||
== Windows == | == Windows == | ||
# Open a command prompt window in administrator mode: | |||
## Search the start menu for "command prompt". | |||
## Right-click on it and select "Run as administrator". | |||
# Use the diskpart tool to convert the drive to GPT: | |||
## Type <code>diskpart</code> and press enter. | |||
## Enter <code>list disk</code>. Note the disk number of the USB flash drive. | |||
## Enter <code>select disk X</code>, replacing <code>X</code> with the disk number of the USB flash drive. Double-check the number is correct, as specifying the wrong number can erase your hard drive or another connected disk. | |||
## Enter <code>clean</code> to clear the disk. | |||
## Enter <code>convert gpt</code> to change the drive's partition table to GPT. | |||
## Enter <code>exit</code> to close diskpart and then close the command prompt window. | |||
# Use the Disk Management tool to create a FAT32 partition: | |||
## Right-click on the start button. | |||
## Select Disk Management. | |||
## Find the USB drive in the list in the bottom pane. | |||
## Right-click the unallocated space and click New Simple Volume[[File:New simple volume.png|none|frame]] | |||
## Click Next to start the volume wizard. | |||
## Leave the default volume size and click Next. | |||
## Leave the default drive letter and click Next. | |||
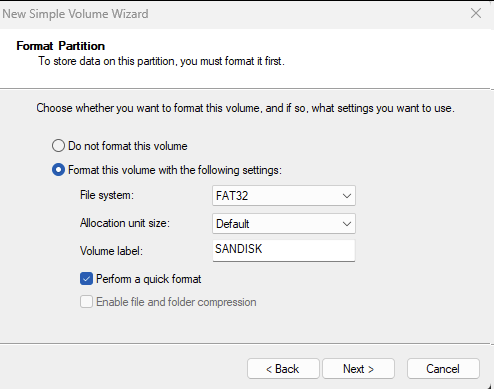
## Set the file system to FAT32. | |||
## Set the allocation unit size to Default. | |||
## Enter any volume label. | |||
## Click Next.[[File:New volume settings.png|none|frame]] | |||
## Click Finish to create the partition. | |||
## Wait for it to complete. The volume name and letter will appear on the partition block when it is created. | |||
== macOS == | == macOS == | ||
# Open Disk Utility from Launchpad or /Applications/Utilities. | # Open Disk Utility from Launchpad or /Applications/Utilities. | ||
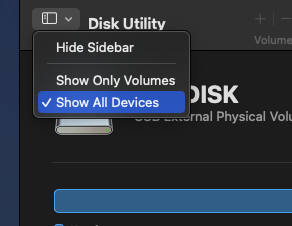
# Click View > Show All Devices.[[File:View all devices.png|none|frame]] | # Click View > Show All Devices.[[File:View all devices.png|none|frame]] | ||
# Select the USB drive (the root item, not the single partition) from the left sidebar and make sure it shows up in the right pane.[[File:Device select.png|none|frame]] | # Select the USB drive (the root item, not the single partition) from the left sidebar and make sure it shows up in the right pane.[[File:Device select.png|none|frame]] | ||
# Click Erase from the top toolbar. | # Click Erase from the top toolbar. | ||
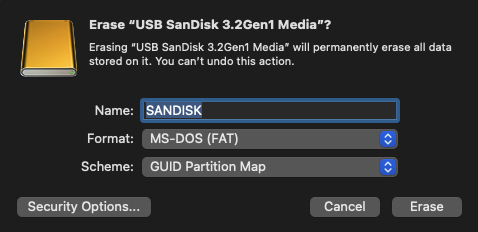
# Enter any name | # Enter any name. | ||
# Set the format to MS-DOS (FAT). | |||
# Set the scheme to GUID Partition Map.[[File:Erase options.png|none|frame]] | |||
# Click Erase. | # Click Erase. | ||
== Ubuntu == | |||
These instructions assume the GNOME Disk Utility is installed. | |||
# Open Disk Utility. | |||
# Select the flash drive from the left sidebar. | |||
# Click the menu (3 dots) button at the top right. | |||
# Erase the entire drive: | |||
## Click Format. | |||
## Set Erase to Quick. | |||
## Set Partitioning to GPT. | |||
## Click Format. | |||
# When formatting completes, select the empty space under Volumes in the right pane. | |||
# Create a FAT32 partition: | |||
## Click the plus button under the volume map. | |||
## Set Erase to Quick. | |||
## Set Type to FAT. | |||
## Enter any name. | |||
## Click Format. | |||
Latest revision as of 11:17, 25 September 2023
IMPORTANT: Before following any instructions on this page, back up anything currently on the flash drive as the entire drive will be erased.
Windows
- Open a command prompt window in administrator mode:
- Search the start menu for "command prompt".
- Right-click on it and select "Run as administrator".
- Use the diskpart tool to convert the drive to GPT:
- Type
diskpartand press enter. - Enter
list disk. Note the disk number of the USB flash drive. - Enter
select disk X, replacingXwith the disk number of the USB flash drive. Double-check the number is correct, as specifying the wrong number can erase your hard drive or another connected disk. - Enter
cleanto clear the disk. - Enter
convert gptto change the drive's partition table to GPT. - Enter
exitto close diskpart and then close the command prompt window.
- Type
- Use the Disk Management tool to create a FAT32 partition:
- Right-click on the start button.
- Select Disk Management.
- Find the USB drive in the list in the bottom pane.
- Right-click the unallocated space and click New Simple Volume
- Click Next to start the volume wizard.
- Leave the default volume size and click Next.
- Leave the default drive letter and click Next.
- Set the file system to FAT32.
- Set the allocation unit size to Default.
- Enter any volume label.
- Click Next.
- Click Finish to create the partition.
- Wait for it to complete. The volume name and letter will appear on the partition block when it is created.
macOS
- Open Disk Utility from Launchpad or /Applications/Utilities.
- Click View > Show All Devices.
- Select the USB drive (the root item, not the single partition) from the left sidebar and make sure it shows up in the right pane.
- Click Erase from the top toolbar.
- Enter any name.
- Set the format to MS-DOS (FAT).
- Set the scheme to GUID Partition Map.
- Click Erase.
Ubuntu
These instructions assume the GNOME Disk Utility is installed.
- Open Disk Utility.
- Select the flash drive from the left sidebar.
- Click the menu (3 dots) button at the top right.
- Erase the entire drive:
- Click Format.
- Set Erase to Quick.
- Set Partitioning to GPT.
- Click Format.
- When formatting completes, select the empty space under Volumes in the right pane.
- Create a FAT32 partition:
- Click the plus button under the volume map.
- Set Erase to Quick.
- Set Type to FAT.
- Enter any name.
- Click Format.


